Setting Out a Building: Right Angles Without a Total Station
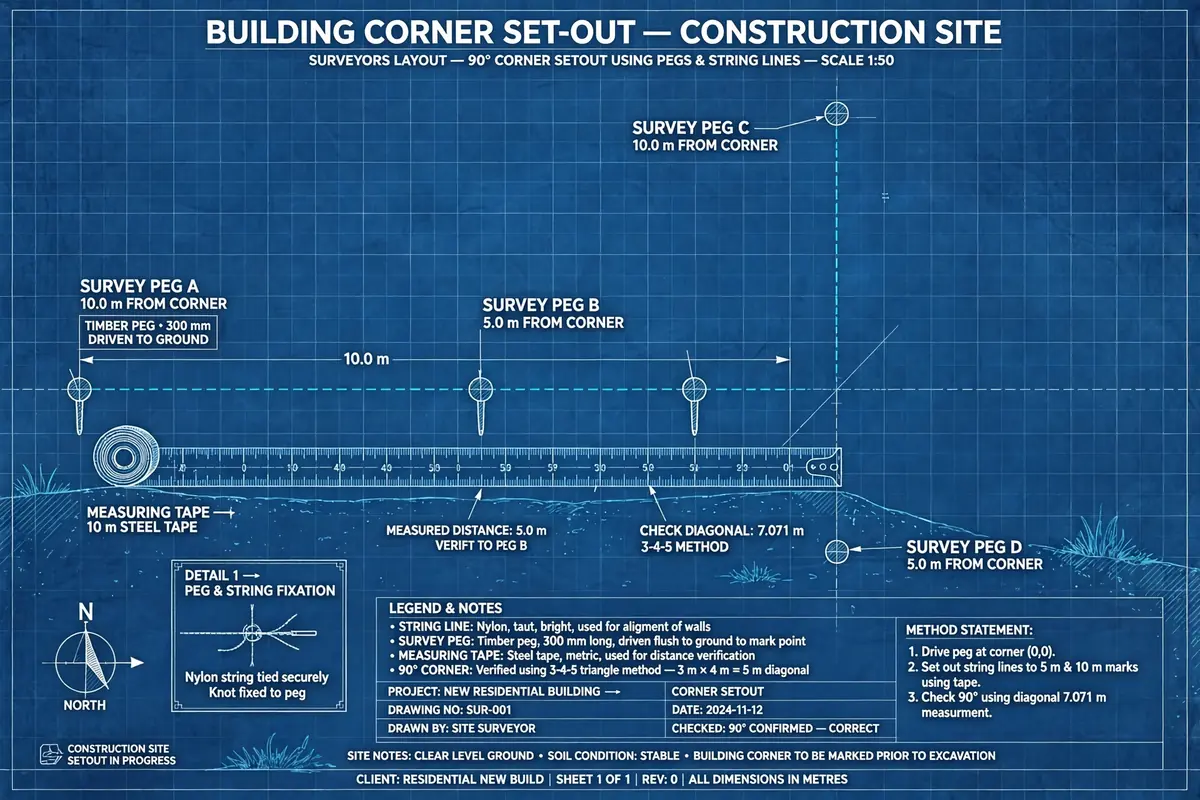
Set out accurate right angles without a total station using the 3-4-5 triangle method, with a worked example, checks and common site mistakes.
Every building starts with a rectangle drawn on bare ground. Get one corner wrong by even a small amount and the error travels with you: walls run out of square, rooms finish with a taper, floor tiles need awkward cuts, and roof members no longer sit neatly on their bearings. The good news is that you do not need a total station to set out an accurate right angle. With two tapes, a handful of pegs, some string and a little patience, a site team can set out a square corner to a standard that is good enough for most houses, extensions and small structures.
This guide explains the method site engineers have relied on for generations: the 3-4-5 triangle. It works because it is not a trick or a rule of thumb. It is Pythagoras' theorem applied directly on the ground, and it can be checked in seconds. Work through it once, slowly, and you will never again have to guess whether a corner is square.
Why a True Right Angle Matters
A building is usually set out as a series of rectangles. If one corner is 89 degrees instead of 90, the opposite wall will drift sideways as it gets longer. Over a 10 metre wall, a single degree of error moves the far end by about 175 mm. That is not a finishing problem; it is a structural and dimensional problem that shows up in brickwork, blockwork, door frames, fitted kitchens and roof geometry.
The Principle: Pythagoras on the Ground
Pythagoras' theorem states that, in a right-angled triangle, the square of the hypotenuse equals the sum of the squares of the other two sides:
a² + b² = c²
The simplest whole-number example is the 3-4-5 triangle:
3² + 4² = 9 + 16 = 25 = 5²
So if you mark 3 metres along one line from a corner, 4 metres along the line you want to be perpendicular, and the distance between those two marks is exactly 5 metres, the angle at the corner is a right angle. The units do not matter as long as they are consistent: 3 feet, 4 feet and 5 feet work the same way, as do 300 mm, 400 mm and 500 mm. On a building site, metres are the practical choice because the triangle is large enough to be accurate but small enough to handle.
Other Pythagorean triples are useful for the same reason. The 5-12-13 triangle is handy when you need a longer leg, and scaled versions of 3-4-5 — 6-8-10, 9-12-15 and 12-16-20 — give you a bigger, and therefore more accurate, triangle on larger plots. The bigger the triangle, the smaller the effect of a millimetre or two of tape error on the resulting angle.
Tools You Need
- Two steel or fibreglass measuring tapes, preferably 30 m or 50 m long
- Timber pegs, profile boards or batter boards, and a hammer
- Nylon string line, nails and a spirit level
- A ranging rod, plumb bob or simply a steady hand for dropping a vertical line from string to peg
- Marker paint, chalk or a felt pen for marking pegs
- A helper — this is genuinely a two-person job, because both tapes need to be held taut at the same time
Step-by-Step: Setting Out a Right Angle with 3-4-5
Suppose you have a baseline already established — for example, the front building line, a boundary, or a line set off an existing structure. You need a second line at exactly 90 degrees to it at a chosen corner point.
Step 1: Fix the corner and the baseline
Drive a peg at the corner point, call it point A, and run a taut string along the baseline through A. This baseline is your reference for everything that follows, so check it twice: it should be straight, taut and pegged securely at both ends so it cannot creep while you work.
Step 2: Mark 3 metres along the baseline
From A, measure 3 m along the baseline and drive a second peg, point B. Keep the tape flat on the ground or, if the ground slopes, hold it level and plumb the measurement down to the peg. A tape lying over humps and hollows measures a longer, sloping distance, not the horizontal distance you need.
Step 3: Swing the two tapes to find the perpendicular
Now hold one tape at A and run out roughly 4 m in the approximate direction of the new line. Hold the second tape at B and run out roughly 5 m. Your helper moves the free ends until the 4 m mark on the first tape meets the 5 m mark on the second tape. Where they meet, drive a peg, point C. The line from A to C is now at right angles to the baseline.
Take care at this step: both tapes must be taut but not stretched hard, and both must be at the same height above the ground. A sagging tape reads long, and a tape pulled at an angle reads long too. Repeat the measurement once to confirm the 4 m and 5 m marks still meet at the same peg.
Step 4: Run the new line and check it
Run a string from A through C and extend it to the full length of the wall. That is your perpendicular building line. As a final check, repeat the 3-4-5 test a little further along if you can, or check the corner again after the profile boards are in. Pegs get knocked; a five-minute recheck before concrete is poured is cheap insurance.
Worked Example: A 12 m by 9 m Building Footprint
Imagine setting out a small house footprint 12 m long and 9 m wide. The four corners are A, B, C and D, with AB as the 12 m front wall and AD as the 9 m side wall.
First, set out AB = 12 m along the baseline and peg both ends. At A, use the 3-4-5 method to establish the perpendicular, then measure AD = 9 m along it and peg D. Do the same at B to establish the second side, and measure BC = 9 m to peg C. You now have four corners, but you have not yet proved the shape is a rectangle rather than a parallelogram. That proof is the diagonal check.
For a true rectangle, both diagonals must be equal, and their length follows from Pythagoras:
Diagonal² = 12² + 9² = 144 + 81 = 225
Diagonal = √225 = 15.00 m
Measure diagonal AC and diagonal BD. If both read 15.00 m — in practice, within about 10 to 15 mm of each other on a footprint of this size — the footprint is square. If one diagonal is longer than the other, the shape is skewed: push the corner at the end of the long diagonal slightly inward, or pull the other corner out, and re-measure until the two diagonals agree. Always re-measure the side lengths after adjusting, because moving a corner changes more than one dimension.
Scaling Up: Bigger Triangles for Longer Walls
A 3-4-5 triangle is excellent for a single corner, but on a long wall a small angular error still grows with distance. The fix is to scale the triangle up. For a long building line, use 6-8-10 or 9-12-15 instead:
- 6-8-10: 6² + 8² = 36 + 64 = 100 = 10²
- 9-12-15: 9² + 12² = 81 + 144 = 225 = 15²
- 12-16-20: 12² + 16² = 144 + 256 = 400 = 20²
Worked check for the 9-12-15 version: mark 9 m along the baseline from the corner and 12 m along the intended perpendicular, then adjust the second line until the distance between the two marks is exactly 15 m. The geometry is identical to 3-4-5, but a 5 mm tape error now represents a much smaller fraction of each side, so the resulting angle is tighter. On open ground where you have room to swing long tapes, always use the largest triangle the site allows.
Common Mistakes That Ruin an Otherwise Good Set-Out
- Measuring over uneven ground. A tape following the ground surface measures slope distance, not plan distance. Keep tapes level, support long tapes midway, and plumb down to pegs on sloping sites.
- Slack or overstretched tapes. A sagging 30 m tape can easily read 20 to 30 mm long. Keep tapes taut with steady, moderate tension and avoid pulling a fibreglass tape hard enough to stretch it.
- Moving pegs. Pegs driven into soft or recently disturbed ground shift when string is tensioned against them. Use profile boards set back from the excavation, so the lines survive digging, and recheck after the boards go in.
- Checking only one corner. A single right angle does not make a rectangle. Check all four corners, or at minimum both diagonals, before any trench is dug.
- Trusting a short square over a long wall. A 600 mm builder's square held against a peg proves nothing about a 12 m wall. Always verify with a full-size triangle or diagonal.
- Ignoring temperature and tape calibration. Steel tapes expand in heat and two tapes from different makers may disagree by a few millimetres over 30 m. For ordinary house setting out this is rarely decisive, but use the same tape for the check measurement as for the set-out where possible.
Accuracy: What Tolerance Should You Aim For?
The honest rule is this: if your diagonals disagree by more than you are comfortable explaining to the engineer, stop and rework the set-out. It is far cheaper to move a peg than to cut a wall, and the time to discover a skew is before the concrete goes in, not when the roof steel arrives.
Reference standards for the wider design context include ACI 318 for concrete structures and Eurocode 2 (EN 1992) for the design of the elements themselves, but setting-out accuracy on the day is governed by the project specification and by good surveying practice: stable control points, level tapes, independent checks, and a written record of the measurements taken.
Setting Out Without a Total Station: When It Is Enough
Tape-and-triangle setting out is well suited to houses, extensions, garden walls, small commercial buildings, drainage runs and fence lines — in short, any job where the geometry is rectangular and the site is reasonably open. It becomes harder on steeply sloping ground, on congested sites where long tapes cannot be swung, or where the design includes curves, odd angles or very tight tolerances. In those cases, a total station or a surveyor's visit is money well spent, and the tape method remains a valuable independent check on their work.
Quick Checklist Before You Dig
- Baseline pegged, taut and checked against a fixed reference
- Each corner proved with a 3-4-5 triangle, scaled up where space allows
- All side lengths measured and matching the drawing
- Both diagonals measured and agreeing within tolerance
- Lines transferred to profile boards set clear of the excavation
- Measurements recorded in the site book, with the date and who checked them
Setting out is one of those site skills that looks simple and rewards care. Establish a firm baseline, prove each corner with a triangle large enough to trust, check the whole rectangle with its diagonals, and write the numbers down. Do that, and a total station becomes a convenience rather than a necessity — and your building will start square, which is exactly where it should start.
Calculations and engineering guides are for planning and educational reference. Verify final designs against applicable codes with a licensed Professional Engineer.