Honeycombing in Concrete: Causes, Prevention and Repair Guide
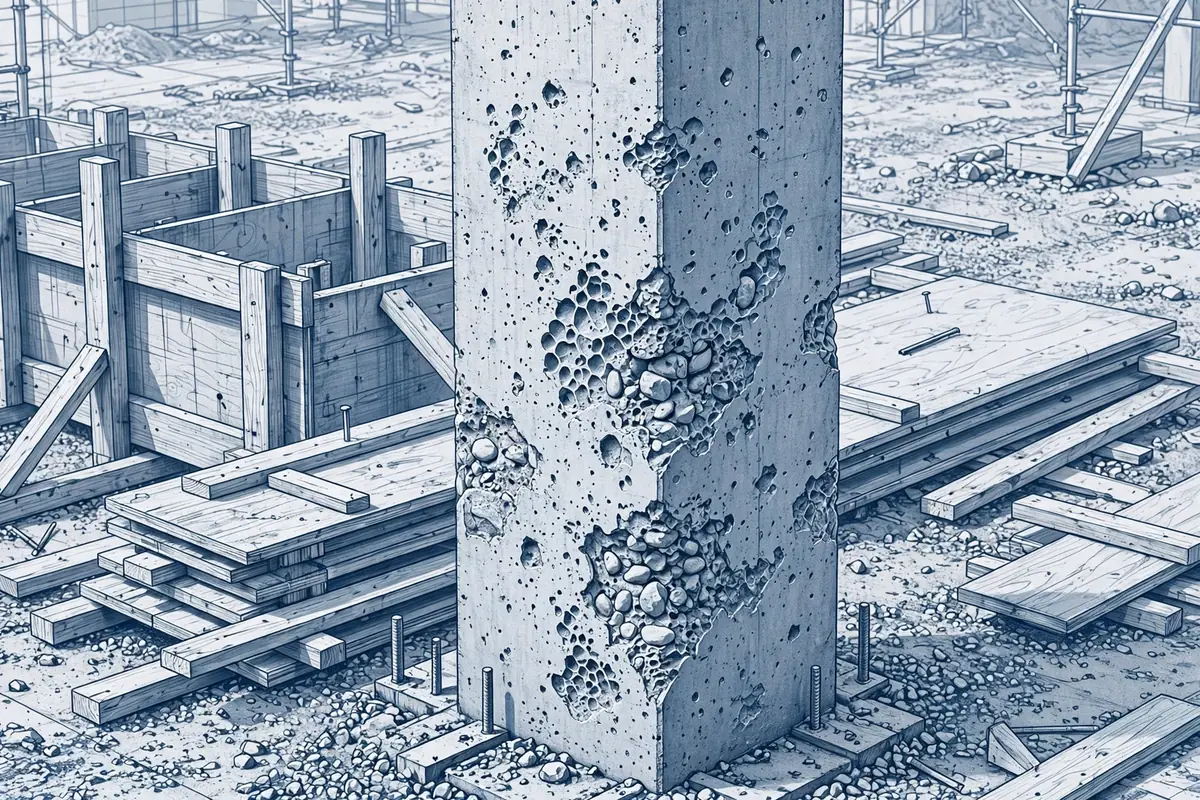
Honeycombing leaves voids that cut strength and expose steel. Learn the causes, a repair-material estimate, and a step-by-step repair method that passes inspection.
There is a moment every site engineer knows. The formwork comes off a column or a beam, and instead of the smooth, dense concrete face you expected, you are looking at a patch of craters — rough voids where you can see individual stones poking out and, in the bad cases, the rebar showing through. That is honeycombing, and it is one of the most common defects you will ever deal with on site. The good news is that most honeycombing is preventable, and most of it is repairable. The bad news is that when you ignore it or patch it badly, you have built a durability problem straight into the structure.
Below: what honeycombing is, why it happens, a worked example for estimating repair material, and a step-by-step repair method that passes inspection.
What honeycombing is — and why it matters
Honeycombing is a defect where the mortar or cement paste has not filled the spaces between coarse aggregate particles, leaving visible voids at or near the concrete surface. It ranges from shallow surface pitting, where the surface looks rough and open-textured, to deep voids that go several centimetres into the section and expose the reinforcement.
The structural concern is not cosmetic. Three things happen when a section is honeycombed:
- Loss of effective cover. The concrete cover is what keeps carbonation and chlorides away from the steel. A 40 mm honeycombed patch with voids 25 mm deep means the real cover in that spot is 15 mm, not 40 mm. ACI 318, IS 456 and Eurocode 2 all treat cover as a durability requirement first — compromising it shortens the member's service life.
- Water pathways. Connected voids let water and air travel straight to the reinforcement. In humid or coastal environments that is an invitation to corrosion, and corrosion products expand and crack the surrounding sound concrete.
- Reduced section and bond. Deep voids mean less concrete carrying load and weaker bond between steel and concrete, which matters in columns and beam anchorage zones.
Classify what you see: surface (minor) is less than about 10 mm deep and does not expose steel; moderate goes deeper but stays localised; severe exposes reinforcement, runs deep, or spreads across a large area. Minor cases can usually be patched by your own crew; severe cases in a critical member need the engineer's eye first.
Causes of honeycombing
Almost every cause comes down to one idea: the concrete in that spot was never fully consolidated, or the paste that would have consolidated it leaked away.
1. Inadequate compaction
The single biggest cause. A vibrator that never reached the bottom of the form, or a poker held in one place while the crew poured metres ahead, leaves trapped air and unfilled gaps around the stones. IS 456 requires placed concrete to be thoroughly compacted so it fills corners and surrounds the reinforcement; ACI 318 likewise requires adequate consolidation. On site, that means the poker head going in and coming out slowly, never used as a substitute for dragging concrete sideways.
2. Leaking formwork
Gaps at form joints, loose plywood seams, or shuttering pulled away from the kicker let the cement paste leak out during vibration, leaving only clean aggregate behind. You will often see honeycombing along the bottom of a column lift, where the head of concrete was highest and leakage pressure greatest. Fix it at the carpentry stage: seal joints, check the kicker, and watch for grout stains on the form face — they mean the same thing is happening inside.
3. A stiff or harsh mix
Low-workability concrete — too little cement, too much coarse aggregate, or a mix that lost slump sitting in the truck too long — will not flow around bars and into corners no matter how long you vibrate it. If the slump at discharge is 25 mm instead of the specified 75 mm, the mix has changed from what was designed, and placement problems follow.
4. Segregation during placing
Dropping concrete from a height, letting it run down long chutes, or discharging it onto a heap that then rolls apart, separates the stones from the mortar. The stones land first and pile up; the paste arrives somewhere else. ACI and IS 456 both limit the free fall of concrete — keep drops under about 1.5 m, use trunking or tremies in deep members, and discharge as close to the final position as possible.
5. Congested reinforcement
Two layers of heavy bars, a thick bundle of laps in a column, or starter bars packed tight at the kicker can physically block concrete and the vibrator head from getting through. When you see congested steel, the design-side answer is a smaller maximum aggregate size and a higher-workability mix for that member, agreed with the engineer in advance — not hoping the concrete will sort itself out.
6. Long delays between lifts
When one lift starts to set before the next one is placed and vibrated into it, you get a weak plane, and sometimes cold-joint honeycombing along the junction. Sequence the pour so each lift is placed and compacted while the one below is still plastic.
Worked example: estimating repair mortar for a honeycombed patch
Suppose the formwork is stripped from a ground-floor column and you find a honeycombed patch on one face: 1.2 m wide by 0.9 m high, with an average depth after chipping out loose material of 60 mm. How much repair material do you order?
Step 1 — volume of the void: area = 1.2 m × 0.9 m = 1.08 m²; volume = 1.08 m² × 0.060 m = 0.0648 m³, say 0.065 m³.
Step 2 — dry material. A polymer-modified repair mortar weighs roughly 2,000–2,100 kg/m³ when placed; take 2,050 kg/m³. Dry mass = 0.065 m³ × 2,050 kg/m³ = 133 kg.
Step 3 — wastage. Repair work wastes more than neat pouring: mortar sticks to the bucket and some falls during hand packing. Add 15%: 133 kg × 1.15 = 153 kg.
Step 4 — bags. With 25 kg bags: 153 ÷ 25 = 6.1 → order 7 bags.
That 7-bag figure also tells you something useful: if the void volume works out to more than a couple of bags, a form-and-pour repair with a flowable non-shrink grout — fed through a funnel and vented at the top — usually gives a denser fill than hand packing deep voids by hand.
How to repair honeycombed concrete: step by step
This procedure covers the typical case — moderate honeycombing that does not expose steel and is not in a critical high-stress zone. It is the method that holds up to inspection.
Step 1 — Assess and get a decision. Mark the boundary with chalk or spray paint, and chip a little with a cold chisel to find the true depth; what looks like 10 mm of surface pitting is often 30 mm once you open it. If steel is exposed, the void is very deep, or the defect sits in a column, shear wall or beam-column joint, get the structural engineer to look before you patch — a patch hides the defect from the next inspection.
Step 2 — Cut back to sound concrete. Remove all loose, crumbly material until you reach solid concrete that rings when tapped. Square off the edges of the patch slightly — feather-edged repairs peel off. Do not use a breaker that fractures the surrounding sound concrete; a chisel or a light grinder with a masonry disc is enough.
Step 3 — Clean thoroughly. Brush, then wash out every speck of dust and loose particles. Dust is the classic reason repairs debond. Let the surface reach a saturated-surface-dry condition: damp, but no standing water.
Step 4 — Prime the bond. For cement-based repairs, paint the prepared surface with a bonding slurry (cement and water, or a proprietary polymer bonding agent) just before packing the mortar, so the repair is placed wet-on-wet. Or use a polymer-modified mortar formulated to bond without a separate primer — follow the product data sheet, because primer compatibility is where site crews most often go wrong.
Step 5 — Fill in compacted layers. Pack the mortar in layers no more than about 25–40 mm thick, ramming each layer hard so there are no voids against the back of the recess. For deep recesses, a small piece of formwork with a grout funnel and a flowable non-shrink grout gives a better fill. Finish the face flush with the surrounding concrete.
Step 6 — Cure it like new concrete. This step is skipped more than any other, and it is why repaired patches crack and peel within a year. Keep the repair moist — damp hessian, curing compound, or polyethylene sheeting — for at least 7 days, following the product data sheet for polymer-modified mortars.
Step 7 — Record it. Photograph before, during and after; note the member, location, approximate dimensions and material used. If the project has a defect register, the repair belongs in it.
Choosing the repair material
- Cement-sand mortar (1:3 or 1:4) with a bonding agent: fine for small, shallow, non-structural surface patches. Cheap and available, but it shrinks more than proprietary mortars and needs careful curing.
- Polymer-modified cementitious repair mortar: the workhorse for most site repairs. Better bond and lower shrinkage; match the product to the thickness — thick-fill and thin-fill products are different.
- Non-shrink cementitious grout: for deep voids repaired by the form-and-pour method, fed through a funnel with a vent so displaced air can escape.
- Epoxy or structural adhesives: only where the engineer specifies them — for example, injecting cracks associated with the honeycombing in a heavily loaded member.
Prevention: the pour-day checklist
Repairing honeycombing is always more expensive than preventing it. Before the next pour, run through these:
- Formwork checked for gaps and sealed at joints and kickers; tie holes plugged.
- Vibrator on site, working, with a head size that fits between the bars — plus a spare.
- Slump checked at discharge against the mix design; reject or retemper only as the engineer permits.
- Placement plan: drops kept short, trunking ready for deep members, lifts placed and compacted while the previous lift is still plastic.
- Cover blocks and spacers in place so bars cannot drift against the form face, which is another way to end up with voids behind the steel.
- Congested zones identified in advance, with a smaller-aggregate or higher-workability arrangement agreed.
- Someone specifically assigned to watch the form joints for grout leakage while pouring.
When not to just patch
Patching is a durability restoration for defects the design can tolerate. It is not the answer when the honeycombing:
- exposes a large area of reinforcement in a primary structural member,
- runs through the full depth of a thin wall or the full width of a column,
- appears together with segregation or cold joints in a zone designed for high shear or moment,
- or shows up in a water-retaining or below-ground structure where the leak path itself is the failure.
In those cases the engineer may ask for a rebound hammer survey or core tests to check what the concrete inside the member actually achieved, and the repair may become pressure grouting, section enlargement, or in extreme cases recasting. Getting the engineer involved early costs a site visit; getting them involved after you have patched over the evidence costs trust.
Key takeaways
Honeycombing is almost always a placement problem — poor compaction, leaky forms, a mix that lost its workability, or concrete segregated before it reached the form. It matters because it eats into the cover your durability design relies on. Most cases are repairable: cut back to sound concrete, clean and prime, pack or pour in compacted layers, cure for a full week, and record what you did. The cheapest repair of all is the one you never make — sealed formwork, a checked slump, and a vibrator that reaches the bottom of the form.
Calculations and engineering guides are for planning and educational reference. Verify final designs against applicable codes with a licensed Professional Engineer.