Foundation Layout: Marking the Building Plan on Ground
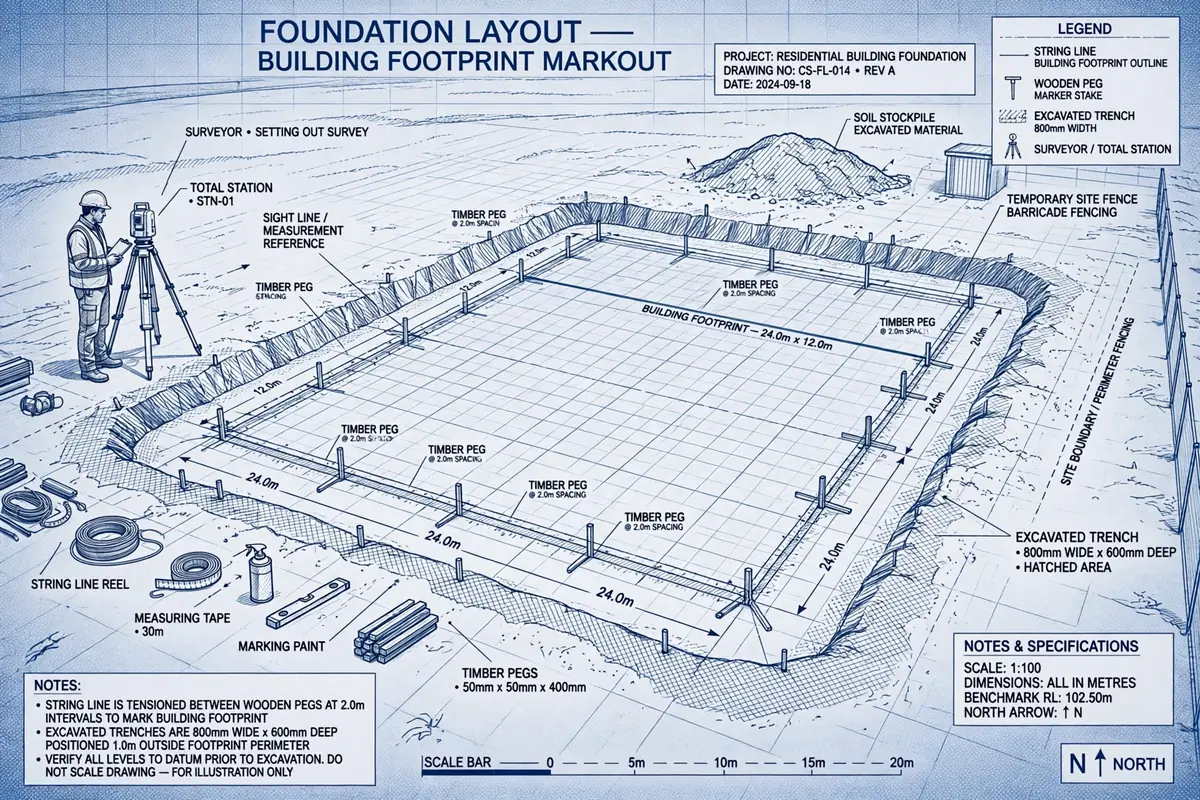
How to set out a building foundation on site: baseline, pegs, string lines, batter boards and the 3-4-5 diagonal check, with a worked example.
Every building starts twice: once on paper, and once on the ground. The second start is called setting out, or foundation layout, and it is the moment the drawing stops being a drawing and becomes a real building. Get it right and every wall, column and footing lands where the designer intended. Get it wrong by even 100 mm and you can end up with a wall sitting on the boundary line, a staircase that does not fit, or a footing poured in the wrong place — mistakes that are expensive, sometimes impossible, to undo once concrete is in the ground.
This guide walks through the full process the way it is actually done on site: preparing the plot, fixing a baseline, marking the footprint with pegs and string lines, checking that the corners are truly square, and protecting the marks until excavation begins. You do not need a total station — a long steel tape, the 3-4-5 method, wooden pegs, string and a spirit level will cover most small residential jobs.
What foundation layout actually means
Foundation layout is the transfer of the plan dimensions from the approved drawing onto the cleared site. The lines you mark are usually the centre lines of walls or the outer faces of footings, depending on what the drawing specifies. From those lines the excavation crew knows where to dig, the steel fixer knows where the footing reinforcement goes, and the mason knows where the first course of blockwork starts.
Two things matter above all else: position and squareness. Position means the building sits the correct distance from the boundary, the road and neighbouring structures, exactly as the approved plan shows. Squareness means every corner is a true right angle. A building that is a parallelogram instead of a rectangle will haunt every later trade — floor tiles will not run true, roof trusses will not bear evenly, and door frames will need packing out.
Before you mark anything: site preparation
Do not start pegging on an uncleared plot. The usual sequence is:
- Clear and level the working area. Remove vegetation, rubbish and loose topsoil from the building footprint. Rough-levelling the plot makes measuring far more reliable than working over humps and hollows.
- Confirm the boundary. Check the survey pegs or boundary stones against the survey plan. If boundary pegs are missing or look disturbed, get the licensed surveyor back before you build — guessing a boundary is how disputes start.
- Fix a datum and a benchmark. Establish one firm reference level on site, usually a peg driven near the site entrance or a mark on an existing permanent structure. Every level in the building — footing bottom, plinth, floor — is measured from this benchmark. IS 456 and good site practice both assume levels are tied to a single datum rather than guessed off the road.
- Read the drawing properly. Note whether dimensions are to wall centres or wall faces, the footing widths, and any offsets from the boundary. Marking centre lines when the drawing gives face dimensions is a classic error.
Tools you need on the day
For a straightforward rectangular house you need: 50 mm × 50 mm wooden pegs about 300–450 mm long, nylon string line, a 30 m steel tape (cloth tapes stretch and lie to you), a builder's square or optical square, a spirit level or water level, lime powder or marking chalk, a hammer, and batter boards — sometimes called profile boards — which are horizontal timber boards fixed to posts set back from the excavation line. Batter boards matter because pegs at the corners get dug out the moment excavation starts; lines stretched between batter boards survive the dig.
Step 1: Fix the baseline
Every layout starts from one straight reference line, the baseline. Usually this is the building line parallel to the front boundary or road, set back by the distance the approved plan requires. Drive two pegs well outside the building footprint, stretch a taut string between them, and check the line against the boundary measurement at both ends. If the plan says the front wall is 4.5 m from the boundary, measure 4.5 m at both ends, not just one — a baseline that is parallel at one end and skewed at the other ruins everything that follows.
Step 2: Mark the first corner and the two main lines
Measure along the baseline to the position of the first corner and drive a peg. From that peg, run the second line at a right angle to the baseline — this is the side wall line. On small jobs the right angle is set with the 3-4-5 triangle method: measure 3 m along the baseline, 4 m along the new line, and adjust until the diagonal between those two points measures exactly 5 m. The 3-4-5 rule works at any scale — 6-8-10 m gives a longer, more accurate check on big plots — because it is simply Pythagoras in disguise.
Step 3: Mark the remaining corners and check the diagonals
Measure the building length along the baseline and the width along the side line, driving pegs at each corner. Then comes the check that separates careful work from guesswork: measure both diagonals of the rectangle. In a true rectangle the diagonals are equal. If they differ by more than about 10 mm over a house-sized footprint, one corner is out of square — shift the offending peg until the diagonals agree, then re-check the side lengths, because moving a corner changes a length.
Worked example: checking a 12 m × 8 m house footprint
Suppose the plan gives a rectangular house 12.0 m long and 8.0 m wide. After pegging the four corners you measure the diagonals. What should they read?
By Pythagoras, diagonal² = length² + width² = 12.0² + 8.0² = 144 + 64 = 208. So the diagonal = √208 = 14.42 m.
On site you measure one diagonal at 14.42 m and the other at 14.47 m. The 50 mm difference tells you a corner is out of square. You ease the suspect corner peg sideways by roughly half the error, re-tension the strings, and measure again. When both diagonals read 14.42 m (within about 10 mm) and the sides still read 12.0 m and 8.0 m, the rectangle is square and you can trust every dimension taken from it.
The same check scales to any shape: for an L-shaped building, split the plan into rectangles and check the diagonal of each one separately.
Step 4: Set out batter boards and transfer the lines
Corner pegs alone will not survive excavation. About 1.0–1.5 m outside each corner line, drive pairs of posts and fix a horizontal board across them at a comfortable working height. Stretch string lines between opposite batter boards so they pass exactly over the corner pegs, then mark the line positions on the boards with a saw cut or a nail. Once excavation removes the corner pegs, the strings can be re-stretched between the same marks and the exact corner positions recovered in minutes.
On the batter boards you can also mark the footing width and wall thickness with additional nails, so the excavation crew can see the trench width directly and the mason can later drop a plumb line from the string to set the first course.
Step 5: Mark excavation lines and levels
With the strings in place, drop the lines to the ground using a plumb bob or by eye with a short spirit level, and mark the trench edges on the ground with lime powder or a shallow score in the soil. The excavation width should be the footing width plus working space — typically at least 150 mm of clearance each side for a mason to work, more in loose soil that needs timbering.
Levels are set from the benchmark, not from the ground surface. Transfer the benchmark level to each batter board with a spirit level, water level or dumpy level, and mark the footing bottom level on a peg driven in the trench once digging reaches depth. A common site rule is that the footing should bear on firm, undisturbed soil — if the excavation hits soft fill or topsoil, keep digging to firm ground and tell the engineer, because founding on fill is a settlement failure waiting to happen.
Step 6: Mark internal walls, columns and pits
Once the outer rectangle is fixed and checked, internal load-bearing walls and column centres are set out from the same baseline, never by measuring off a freshly dug trench. Column centres are usually marked with a small peg and a nail, and their positions double-checked by measuring between column centres along both directions. Service pits, septic tanks and soakaways are marked at the same stage so later excavation does not clash with the foundation trenches.
Common layout mistakes and how to avoid them
- Measuring from a disturbed peg. Re-check the baseline pegs each morning. A peg kicked overnight silently moves the whole building.
- Using a stretched cloth tape. A cloth tape under tension can read long by 30–50 mm over 30 m. Steel tapes are the site standard for a reason.
- Checking only one diagonal. One diagonal can be correct while the shape is still a parallelogram. Both diagonals must agree.
- Setting out from the boundary fence instead of the survey line. Fences are rarely built on the true boundary. Trust the survey pegs, not the fence.
- Forgetting the offset. Marking the wall face when the drawing dimensions are to the wall centre shifts every footing by half a wall thickness — around 100–115 mm for a typical block wall.
- Losing the marks. Photograph the layout with a tape in frame, and record the main dimensions and offsets in the site diary. If the strings are cut, the record rebuilds them.
When to bring in a surveyor
For a simple rectangular house on a clear plot, a competent site engineer or experienced mason can set out with tapes and the 3-4-5 method. Bring in a licensed surveyor when the plot boundary is disputed or unclear, the building is multi-storey or has a complex shape, the site is steeply sloping, or the local authority requires a certified set-out. The surveyor's fee is small compared with the cost of demolishing a footing poured in the wrong place.
Final check before excavation starts
Walk the layout one last time with the drawing in hand: boundary offsets at both ends, all four sides, both diagonals, column centres, and the benchmark level. Have a second person independently re-measure the diagonals — a fresh pair of eyes catches the error you have stopped seeing. Only then give the excavation crew the go-ahead. The half hour this check takes is the cheapest insurance on the whole project, because everything built afterwards inherits the accuracy of the lines you marked today.
Frequently asked questions
How accurate does foundation layout need to be?
For residential work, aim for ±10 mm on the main dimensions and diagonals. Larger tolerances are acceptable on long boundary offsets, but a 25 mm error at the foundation can still show up as a visible kink in a long wall.
What is the 3-4-5 method?
A practical way to set a right angle using Pythagoras' theorem: measure 3 units along one line, 4 units along the second, and adjust until the diagonal between the marks is exactly 5 units. Any multiple (6-8-10, 9-12-15) works, and longer triangles give more accurate results.
Why are batter boards better than corner pegs?
Corner pegs sit exactly where excavation happens, so they are destroyed by the first dig. Batter boards sit outside the excavation, so the layout lines can be re-established at any time during the foundation work.
Can I set out a building without a surveyor?
Yes, for a simple shape on a plot with clear, undisturbed boundary pegs. If the boundary is uncertain, the shape is complex, or certification is required, use a licensed surveyor.
Calculations and engineering guides are for planning and educational reference. Verify final designs against applicable codes with a licensed Professional Engineer.