Cube Casting and Testing Schedule for a Typical Concrete Pour
How many concrete cubes to cast per pour, when to test them at 7 and 28 days, and how to read the results — a practical testing schedule for site engineers.
Every concrete pour on site leaves one question behind it: is the concrete actually as strong as the design assumed? The cube test is how you answer it. Cast properly, cured properly and tested on schedule, a set of 150 mm cubes gives you an early warning at 7 days and a verdict at 28 days. Cast carelessly, and the cubes tell you more about the person who made them than about the concrete in the structure.
This guide sets out a practical cube casting and testing schedule for a typical pour: how many cubes to cast, when to test them, how to work out the strength, and how to judge whether the results pass. It follows IS 456 and IS 516 practice, with notes where ACI 318 differs.
What a Cube Test Actually Measures
A cube test measures the compressive strength of concrete at a given age. A cube is crushed in a compression testing machine until it fails, and the strength is the failure load divided by the loaded area. For a standard 150 mm cube:
Compressive strength (MPa) = failure load (N) / 22,500 mm²
Because 1 MPa = 1 N/mm², a cube that fails at 600,000 N gives 600,000 / 22,500 = 26.7 MPa. That number is then compared with the specified characteristic strength of the grade, for example 25 MPa for M25.
Note the distinction that trips up juniors: the grade number is a characteristic strength, meaning at most 5% of test results are expected to fall below it. A single cube result slightly under the grade does not automatically mean the concrete has failed — acceptance is judged on averages and on rules set out below.
How Many Cubes to Cast per Pour
The number of cubes depends on the volume poured. IS 456 gives the sampling frequency for a pour as follows:
- 1–5 m³: 1 sample
- 6–15 m³: 2 samples
- 16–30 m³: 3 samples
- 31–50 m³: 4 samples
- 51 m³ and above: 4 samples, plus 1 additional sample for every extra 50 m³ or part of it
One sample normally means one set of cubes taken from one batch of concrete. The usual site practice is 6 cubes per sample: 3 for the 7-day test and 3 for the 28-day test. Some specifications also ask for 3 extra cubes for a 3-day or 14-day test when early strength matters, for example before striking formwork or stressing a member. If in doubt, cast a spare set — a cube you never needed costs almost nothing, while a missing test age cannot be recreated.
Under ACI 318, the rule is different: at least one set of cylinders per day, per 150 cubic yards, and per 5,000 square feet of slab or wall surface. The principle is the same — sample often enough that no large volume of concrete goes untested — but check which code your project specification invokes before you plan the schedule.
Casting the Cubes: The Steps That Matter
Most bad cube results are made at the casting table, not in the testing machine. Get these steps right:
- Sample the right concrete. Take the sample from the middle of the load or the middle of the discharge, never the first or last portion, which can be unrepresentative.
- Use clean, lightly oiled 150 mm steel moulds. Rust, dents or dried concrete in a mould distort the cube and the result.
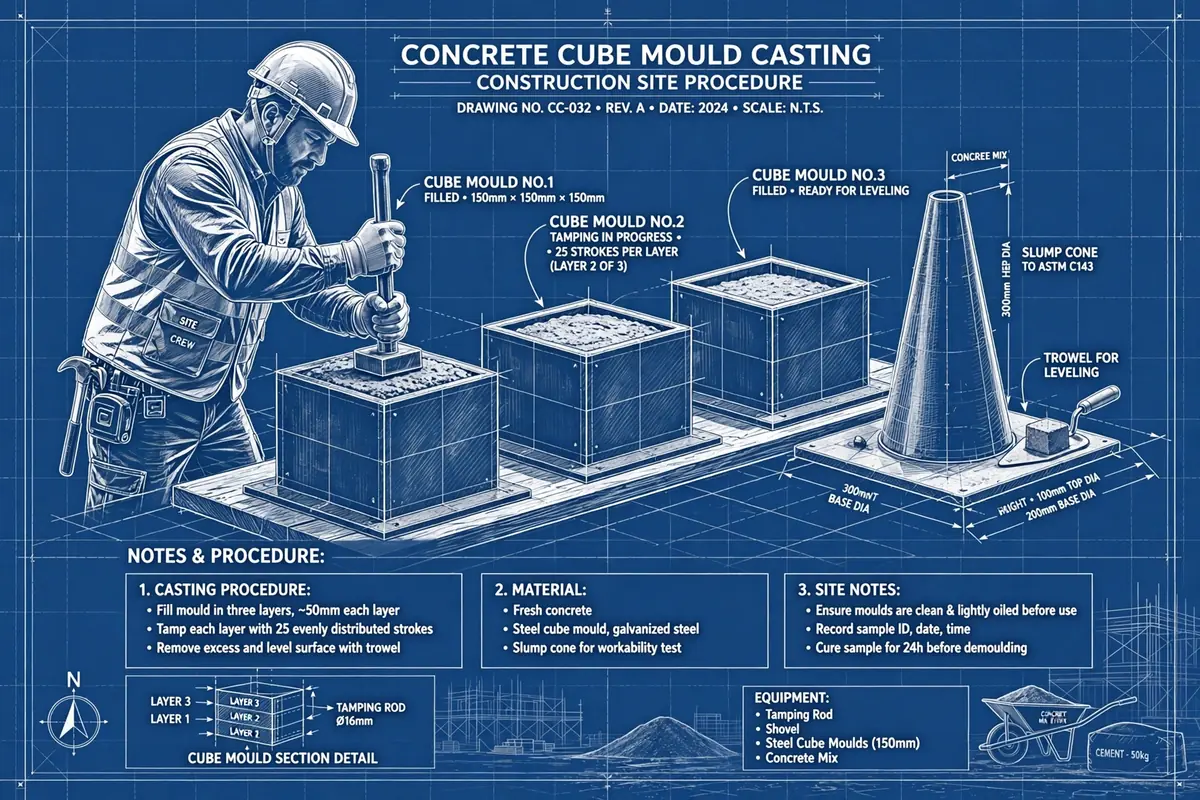
- Fill in three layers of about 50 mm each. Compact each layer with 25 strokes of a 16 mm tamping rod, distributed evenly over the surface. Rod the lower layers fully and each upper layer just into the layer below.
- Tap the sides of the mould with a mallet or the rod after each layer to close voids against the faces.
- Strike off the top surface level with a trowel and finish it flat. A rough or domed top face loads unevenly and reads low.
- Mark each cube immediately with the pour location, date, grade and sample number — on the side of the mould or on a tag, not from memory later.
- Leave the cubes undisturbed for 24 hours in a shaded, vibration-free spot, covered with wet hessian or plastic sheet.
One common shortcut to avoid: casting cubes from concrete left over in the wheelbarrow at the end of the pour. By then it may have started to stiffen, and the water content and workability no longer match what went into the structure.
Curing: Where Most Site Results Go Wrong
After 24 hours, demould the cubes carefully and place them in a curing tank or moist room at 27 ± 2 °C until testing, as IS 516 requires. The cubes must stay submerged or in a humidity above 90% for the full period.
This is the step most often compromised on site. Cubes left to dry on a window ledge, or stored in a tank of warm, stagnant water in direct sun, will under-read — sometimes by 20% or more. When that happens, the laboratory blames the concrete and the engineer orders investigations, all because of a curing tank nobody checked. Check the tank temperature and water level weekly, and keep a simple log.
The Testing Schedule: 7 Days and 28 Days
The standard schedule for each sample is:
- 7-day test: an early indicator. Concrete typically reaches about 65–70% of its 28-day strength by 7 days. A 7-day result well below this range is an early warning to investigate — check the batch records, water added on site, and curing — before the 28-day result arrives.
- 28-day test: the acceptance test. The grade of the concrete (M20, M25, M30) is defined by its 28-day characteristic strength, so this is the result the design is judged against.
Work the dates out the day you cast, and write them on the sample register. For a pour cast on 10 November, the test dates are:
- 7-day test: 17 November
- 28-day test: 8 December
Test on the scheduled day, not "when the lab is free". A cube tested at 30 days instead of 28 will read slightly high, and one tested early reads low — either way the result no longer compares fairly with the grade.
Worked Example: A 24 m³ M25 Slab Pour
Suppose you are casting a 24 m³ ground-floor slab in M25 concrete. Here is the full schedule, worked through.
Step 1: Number of samples
From the IS 456 frequency table, 24 m³ falls in the 16–30 m³ band, so you need 3 samples. At 6 cubes per sample (3 for 7 days, 3 for 28 days), you cast 18 cubes in total.
Step 2: Test dates
If the pour is on 10 November, the 7-day tests fall on 17 November and the 28-day tests on 8 December.
Step 3: The 7-day result
One sample's three cubes fail at 385 kN, 405 kN and 395 kN. Dividing each by 22,500 mm² gives 17.1 MPa, 18.0 MPa and 17.6 MPa. The average is 17.6 MPa, which is 70% of the 25 MPa grade — right in the expected 65–70% range. The pour is on track.
Step 4: The 28-day result
The same sample's 28-day cubes fail at 594 kN, 626 kN and 583 kN, giving 26.4 MPa, 27.8 MPa and 25.9 MPa. The average is 26.7 MPa.
Step 5: Judge acceptance
Under IS 456, a set of three cubes passes if the average is at least the characteristic strength and no individual cube is more than 3 MPa below it. Here the average of 26.7 MPa is above 25 MPa, and the lowest single cube, 25.9 MPa, is well above 22 MPa. The sample passes.
If the average had fallen short, the next step is not panic but investigation: check batching records, site-added water, curing conditions and the testing machine calibration, and, if the concrete in the structure is genuinely suspect, core testing or non-destructive testing on the member itself. Cube results trigger the investigation; they are not, on their own, proof that the structure is unsafe.
A Simple Register You Can Copy
Keep one row per sample in a notebook or spreadsheet, with these columns: date of casting, element and location, grade, volume of pour, sample number, number of cubes, 7-day test date and result, 28-day test date and result, and remarks. Fill it in on the day of the pour, not at the end of the week. A register that is a month behind is how test dates get missed and acceptance arguments get lost.
Common Mistakes to Avoid
- Testing cubes late or early and comparing the result with a 28-day grade anyway.
- Adding water to the sample to make it easier to compact — this changes the water-cement ratio and invalidates the result.
- Using damaged or uncalibrated moulds, or a testing machine whose calibration has lapsed.
- Forgetting the spare set when early strength is needed for striking formwork or loading a slab.
- Mixing up samples between two pours on the same day — marking cubes at casting time prevents this entirely.
Frequently Asked Questions
Can I use 100 mm cubes instead of 150 mm?
Yes, where the specification allows it, typically when the maximum aggregate size is 20 mm or less. Note that 100 mm cubes tend to read slightly higher than 150 mm cubes from the same concrete, so apply the correction factor your specification requires before comparing with the grade.
What if a 7-day result is low but the 28-day result passes?
That happens, especially with slow-gaining mixes containing fly ash or slag. The 28-day result governs acceptance, but a low 7-day result is still worth a note in the register — it may mean the curing or the mix needs attention on the next pour.
Do I need cubes for every small pour?
Follow the frequency table for your code and specification. For very small pours, one sample is the minimum — skipping testing altogether leaves you with no evidence at all if the concrete is ever questioned.
The Bottom Line
A cube testing schedule is not paperwork for its own sake. Three samples for a 24 m³ pour, six cubes per sample, tested at 7 and 28 days, cured at 27 °C and recorded the day they are cast — that simple routine is what turns a concrete pour from an act of faith into a verifiable result. Set the schedule up before the truck arrives, and the results will look after themselves.
Calculations and engineering guides are for planning and educational reference. Verify final designs against applicable codes with a licensed Professional Engineer.